Before start
is worth mentioning that this flash of 2.1:
- The phone loses the Bluetooth function with rom 2.1 and still no fix for that, I flash to try and really do not care as soon not have bluetooth function.
UPDATE: NOW BLUETOOTH WORKS WITH VERSION 3, SEE THIS POST:
http://todaviaandoborracho.blogspot.com/2010/09/actualizacion-b3-para-backflip-android.html
- The phone where I installed a Backflip at & t, not whether it works in another phone.
EDITION: Telcel also tested (with the Italian radio, find the post right here) and also in Argentina
Android
- is essential to make a backup of your phone and SD card, if they do not and kill your phone or stay in a loop is essential that they have their support to revive
- No way am I responsible if your phone is left as brick, in other words if in a coma or dying altogether not make me to fart to me, if in doubt better NOT PUT THE FLASH. if you still want to continue then:
Pre-requisites:
The phone must be root and have the option of Android Recovery j_r0dd of, if not follow these instructions:
http://todaviaandoborracho.blogspot.com/2010/09/nandroid-respaldo-de- tu-backflip-ya.html
http://todaviaandoborracho.blogspot.com/2010/08/como-rootear-el-motorola-backflip-como.html
1. With the phone off, press the power button and camera button to enter recovery mode when the phone say, camera release key press the volume down, the one with the down arrow at the end is going to bring to the screen of Android recovery:

Select backup / restore and make a backup of your image in case something happens or want to go back to 1.5 (the options are selected with the volume buttons and confirm with the power button)
Then I recommend you back up your SD card at this point and will have their picture made on the back so it is essential that support SD card. Restart your phone and from windows or the system that have made a backup of your card because in the flash process Figure 2.1 will format your card and lose all your data, warned ....
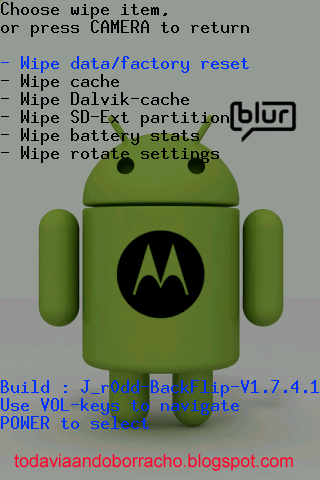
2. Once you have made the back of your card to start again Recovery your phone on and now will select the option to Wipe, when carried to this screen to be selected and run ALL the options (again, selected with the volume buttons and press the power button to confirm, if they do the question if they are safe again press the power button, this applies to all recovery options you'll use)
3. Once you have completed all the options with the camera button will return to the main screen of recovery and will select Partition SD

And then will select and implement all menu options

press the camera button to return to the main menu and now
3. Will select the option USB-MS toggle, this is going to mount your phone as a card, connect your USB cable and once it appears on your computer copy it to the card file j_r0dd's 2.1 preclear going to download it here:
http : / / www.mediafire.com/?m175qw291tv3ppp
When you are finished copying press the power button on your phone to exit the USB mode, we are ready to flash the ROM. Before proceeding
remember:
- The lost phone with Bluetooth function 2.1 rom still no fix for that
UPDATE: NOW BLUETOOTH WORKS WITH VERSION 3, SEE THIS POST:
http://todaviaandoborracho.blogspot
.com/2010/09/actualizacion-b3-para-backflip-android.html
- The phone where I installed a Backflip at & t, not whether it works in another phone.
UPDATE: ALSO INSTALLED backflip TELCEL AND WORKS WELL BUT HAVE TO CHANGE THE RADIO, READ THIS POST:
http://todaviaandoborracho.blogspot.com/2010/09/motorola-backflip-de-telcel-android
-21.html - No so I am responsible if your phone is left as brick, in other words if in a coma or die completely made me not to fart to me, if in doubt better NOT PUT THE FLASH.
Well, now if a flash:
4. Still in Recovery screen select from SD Flash zip, you'll see the text "SDCARD: signed-j_r0dd.preclair.b1" press the power button, this will complete the writing process, here there is no turning back, do not interrupt him, when I say complete or donate (do not remember), when finished, then reboot system select''''now, when you restart the phone will see the motorola M and white screen for a few minutes and then goes to be an animation with the green pet Android, view photos and video here below, when you get here will be patient and wait, if they followed all the steps your phone will take as long as 10 or 15 minutes if they did all the steps it can take longer.

at the end of this time will boot into the login screen MOTOBLUR (this rom still has MOTOBLUR) at the end to register your account and google MOTOBLUR will take longer to screen.

Ready, already have 2.1 on your Android phone.
Here is the English Sub1me14 tutorial, thanks a el, a j_r0dd y a modmymobile.com que son las fuentes de donde tomé los archivos y el metodo.
Tutorial de Sub1ime14
Installation Steps (Full Detail)
Steps 1 - 5: Create The Backup
1. If you don't already have j_r0dd's recovery image installed, go here and install it. While powered off, hold the camera button fully down, then while holding it, press the power button for a moment, and keep holding the camera button until you get a screen with green text ("USB FastBoot", etc). At this screen, press the volume- down key (yes, it will say you've pressed VOL UP - don't worry). You'll end up at j_r0dd's recovery image (green android guy w/ a down-arrow on his stomach).2. Arrow down (using the volume-down key) to the third option - "Backup/Restore". Select it by tapping the power key.Steps 6 - 8: Copy SD Card Contents To PC
3. With the first option already highlighted (Nand backup), select it by tapping the power key. When prompted to verify, tap power key again to begin backup process. You will see "Performing backup : ........" for a few minutes (with the number of periods growing as it progresses).
4. Once the backup completes, you'll see "Backup complete!" Press the camera key once to back the menu up to the main menu.
5. Make sure "Reboot system now" is selected, and tap the power key. Your phone will boot into its normal mode (you're still on 1.5 at this point - nothing has changed yet).
6. Connect your phone to your computer by USB cable and choose "USB Drive" as your mode (drag to your notifications, click the USB item there, and choose "USB Drive").Steps 9 - 23: Wiping/Preparing the Phone & SD Card
7. Open Windows Explorer (aka My Computer), navigate to the "Removable Disk" drive that represents your phone's SD Card. Highlight all items, choose Edit->Copy.
8. Navigate to some folder on your computer (in "My Documents" or something - anywhere, really), and create a folder called something to the effect of "Backflip backup before 2.1". Paste the files into that folder (Edit->Paste).
*Note: This copies your f iles and your Nandroid backup that was made in steps 1-5, because that backup is present on your SD card in the folder "Nandroid" - which is getting copied as part of this step
9. Once the file copy is completed, and you're sure you've got everything there on your local PC, go ahead and unplug the USB cable from your phone, and power the phone down.Steps 24 - 26: Flashing The ROM (The GOOD part!)
10. Once again, boot into recovery mode (see Step 2 for a refresher on how).
11. Once you're in the recovery screen, navigate down to "Wipe" and select it.
12. Select "Wipe data/factory reset". Press the power key again to confirm when prompted.
13. Once that completes, select "Wipe cache". Press the power key again to confirm when prompted.
14. Once that completes, select "Wipe Dalvik-cache". Press the power key again to confirm when prompted.
15. Once that completes, skip over "SD-Ext partition" . Select "Wipe battery stats". Press the power key again to confirm when prompted.
16. Once that completes, select "Wipe rotate settings". Press the power key again to confirm when prompted.
17. Now, once that last one completes, press the camera button to back out to the main menu. Navigate down to "Partition SD" and select it.
18. Select "Partition SD" from the sub-menu. Use all the default values and just proceed through the process.
19. Once finished, press the camera button to navigate out to the main menu. Navigate to "USB-MS toggle" and select it (this mounts your phone as a drive on your PC, just like "USB Drive" mode).
20. Plug your phone into the PC via USB.
21. If you have not already done so, download j_r0dd's 2.1 Preclair ROM from page 1 of this thread.
22. On your PC, open Windows Explorer (My Computer) again and navigate to where you stored the ROM. Copy it (Edit->Copy) and then navigate to the "Removable Disk" drive (your phone) and paste the file (Edit->Paste). This will probably take a minute or a few to complete.
23. Once the file is completely copied to your phone, unplug the USB cable and tap the power button on your phone (this ends the USB-MS session).
24. You should be at the main menu of the recovery screen right now. Navigate down to "Flash zip from SD" and select it.I certainly don't mean to overstate things, but I found that there were some steps that I was only vaguely following until I got through the whole process. My hope is that a painfully literal step-by-step guide will alleviate the fears of people who want to try this but aren't sure they follow the process.
25. You'll see the text "SDCARD: signed-j_r0dd.preclair.b". Press the power key. Proceed through the application of the ROM.
26. Once complete, select "Reboot system now".
*Note: You'll see the white Motorola screen with the black-circle "M" for a bit and then a green screen with the green Android mascot. This step will probably take a few minutes (at least 5, likely 10 or 15), but eventually you should find it completes booting and goes into the home screen. Enjoy!
Best of luck, and of course, a huge thanks to j_r0dd and all who participated so far! If anybody should see a mistake in my process, I'm more than happy to edit and correct it.
0 comments:
Post a Comment